 Oak Hill Kennel
Oak Hill Kennel
Oak Hill Kennel
Force-fetching is the process of making a dog absolutely reliable in its bird/dummy handling and delivery. It converts retrieving from a matter of play to a matter of obedience. It provides a foundation of confidence for advanced training--no matter how confusing or stressful a situation, the dog knows that going when sent is the right thing to do. This confidence is the basis of greater style and intensity than is possible in any play-retrieve.
Although many owners are uncomfortable applying systematic direct pressure (i.e. pain) to their dogs, it is far more humane to force-fetch, and yields infinitely better results, than to situationally reprimand a dog that lacks the foundation to understand clearly what its trainer desires.
|
You do not need an electric collar to force-fetch your dog. The main advantage of the collar is in giving well-timed corrections to a dog working at a distance. For close-in work, other methods of reinforcement are equally or more effective. |
Force-fetching may be the most intimidating part of training for the novice. Many feel it can only be done by a professional. Some of the best retriever writers--James Lamb Free, for one--say that it is unnecessary. Others mention it but don't provide instructions. Why such frustrating vagueness? One reason is that it is done differently for every dog, and experience is a great asset in knowing when to apply pressure, when to let up, and when to move on.
We hope, in this article, to give you the information you need to make these judgments, and to do a good job force-fetching your own retriever. Our procedure works on a wide variety of dogs, including the softest Chesapeakes; while some tough Labs may be rushed through by increasing the pressure, we do not recommend this, particularly for novice trainers.
You do not need an electric collar to force-fetch your dog. The main advantage of the collar is in giving well-timed corrections to a dog working at a distance, with greater safety and less elaborate setups than older methods such as the shotgun, slingshot, or BB gun. For close-in work, other methods of reinforcement are equally or more effective. Many successful collar trainers today teach obedience and force-fetch without the collar, then use the dog's understanding of commands to introduce electric-shock correction, instead of teaching with the collar.
The first key to successful force-fetching is to judge progress by the dog's response at each step, not according to what you have done or a timetable of predicted results. No one can tell you how long it will or should take to force-fetch your dog. Dogs vary widely in the time it takes to master force-fetch, and progress depends further on the trainer: how effectively he/she communicates with the dog, consistency of work, etc. Be sure the dog has fully mastered each step before attempting the next. Don't get hung up on trying to get the job done fast--focus instead on what a good, reliable retriever your dog is going to be.
The second key is patience. Most retrievers will try your patience! Progress in force-fetching is not steady, but tends to go in jumps and breakthroughs (with periods of no apparent progress in between). At some point, or at several points, the lack of correct response is likely to make you feel that you are in a struggle or contest with your dog, and by golly, you are going to win! The way to win is through patience. With continual insistence you will outlast all of your dog's explorations of how not to fetch properly. Do not be in a hurry; skipping or shortcutting steps will cost you much more time and frustration down the road.
The third key is the dog's attitude. As Mike Lardy says, "there is no attitude drill." The only way to develop an eager, happy retriever is to maintain the dog's trust and enthusiasm throughout its training, including force-fetching. This is the most demanding phase of training the dog has yet faced--don't make it a miserable grind. We want to teach a productive and confident response to training pressure. In every session, mix in movement (heeling, coming when called) and build confidence by reviewing work the dog knows. Some sessions may begin or end with a "happy bumper" if it doesn't reinforce bad habits like dropping the dummy. Keep sessions short--five minutes is plenty. Do not begin before your dog�s permanent teeth are fully in; it must be able to hold the dummy firmly without pain.
|
|
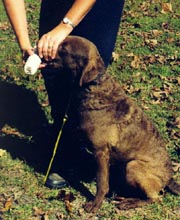
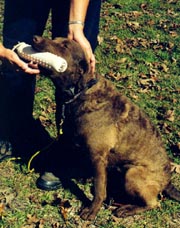
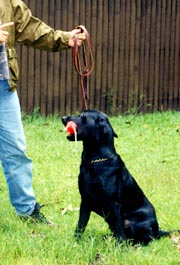
Place the dummy in the dog's mouth as described in the text |
|
|
Support the dog's chin and praise |
The details of the procedure, such as commands used, ear pinch vs. toe pinch, and whether or not to use a training table, can be varied with good results. We describe our method, but if you are fortunate enough to work under the supervision of an experienced trainer, we encourage you to follow his or her instructions.
Before beginning force-fetch, the dog must have mastered basic obedience: "heel," "sit," "stay," come when called. It is easiest if the dog wears a choke or pinch collar, to which a checkcord is attached, and a wide (one inch) buckle collar adjusted to be snug and ride high on the dog's neck behind its head.
Most dogs respond with some degree of head movement--open their mouths wide to drop the dummy, try to push it away with their tongue, etc. If, in its efforts to resist, the dog stands up, forget the dummy and give an emphatic sit correction while saying, "Sit!" Then start over. If the dog repeatedly stands up to struggle, back up and work on obedience some more. You may find it helps to switch from a choke to a pinch collar.
As soon as the dog relaxes and accepts the situation, praise it, then take the dummy out of its mouth while saying, "leave it!" Heel forward a few steps, sit the dog, and repeat.
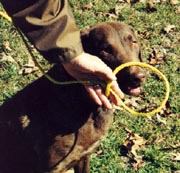
An important principle of training is to avoid getting into any protracted physical struggles with a dog. If your dog is committed to fighting introduction of the dummy into its mouth, put a loop of its check cord around its muzzle before putting in the dummy (see photo sequence). Pull to tighten the check cord, and the dog is now fighting the cord instead of you. While many dogs succeed in spitting the dummy out, repetition of this procedure usually gets them to accept the dummy satisfactorily.
|
|
|
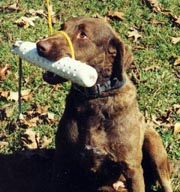
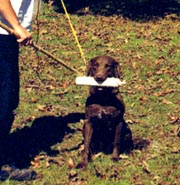
If necessary, make a loop to put over the dog's muzzle |
Snug it up and the dummy stays in |
|
|
Progress to holding without support |
|
|
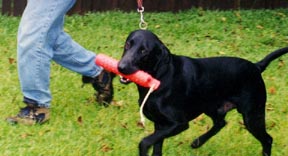
Using a stick to encourage a firm hold. Praise when the dog's grip tightens |
Next we want to get the dog to take responsibility for holding the dummy. When the dog is comfortable with the five-second hold with your hand supporting its chin (often in the first session), lower your hand briefly; if the dog's hold slackens, quickly bring your hand back up to close its mouth and repeat "Hold!" If the dog lowers its head, raise it back up when you return your hand to its chin.
We then increase the dog's responsibility by adding correction. Now when you place the dummy in the dog's mouth and lower your hand from its chin, allow the dog to drop the dummy and, as soon as the dummy leaves the dog's mouth, chuck the dog under the chin with your ever-ready right hand while saying "No!" For a cooperative or young dog, use a fairly gentle tap--it will understand your disapproval. Tougher, less tractable dogs may require you to progress to striking them more sharply. Quickly put the dummy back in the dog's mouth and repeat, "Hold."
Mix up holds with correction and holds where you "rescue" the dog from its mistake by supporting its chin. If the dog gets to quickly spitting out the dummy and ducking away, you are using too much correction and not enough help. Praise the dog when the dummy is in its mouth, whether the dog is holding on its own or whether you are supporting it. Continue to heel the dog forward frequently, after doing one to three holds in one spot. As the dog learns, lengthen the duration of holds, but continue to keep the sessions short. Always try to end with success, even if you have to simplify the task in order for the dog to be successful.
Don't be surprised if, as you progress with this stage, you find your dog clamping his mouth shut so that you need to pry it open to put the dummy in. This is common and is usually associated with a firmer grip when holding. Take it as a sign you are making headway.
As the dog gets the idea, increase its level of responsibility. Walk out front, then all the way around the dog as it sits holding the dummy. With a stick, tap and stroke the dog's body, neck, even legs. This is to teach the dog that it must concentrate and hold on regardless of distractions. Next use the stick to tap the ends of the dummy. The dog should respond by tightening its grip (praise it!). You can also jerk the dummy cord lightly while saying "Hold." Here is where you can make some headway with a slack-mouthed dog or one that rolls and chomps the dummy. Tap the dummy when it is dangling or when the dog is rolling it. If the dog drops it, chuck it solidly under the chin, say "No! Hold!" and put the dummy back in place.
|
|
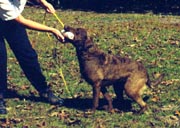
Use tension on the lead, chin support, body language, and praise to get the dog moving |
|
|
Work until the dog will hold and heel at a run |
Use the same techniques as before to get the dog holding the dummy on its own while moving, and to get it moving farther. Keep working until the dog can go over obstacles at a fast trot or lope without dropping the dummy. Have it come to heel position and sit while holding. For all this movement, use body language rather than verbal commands ("sit" usually does not cause a problem).
While none of these steps should be skipped or shortcut, it sometimes works to get the dog moving with the dummy before using the stick to create distractions. This is especially good for dogs which quickly learn to hold the dummy tightly and without chomping and rolling it. For dogs with more nervous mouths, work with them sitting until they will hold the dummy firmly and still.
In Part II, we will describe how to get the dog to grab the dummy on command, thus developing a fast, positive pick-up and laying the foundation for going when sent.
Oak Hill Kennel, Pinehurst, NC (910) 295-6710
Copyright © 1998 Oak Hill Kennel